 If you've read my previous posts, Top 10 Websites for Testing Your Blog's Speed and Top 13 Things to Scrap from Your Blog IMMEDIATELY, you'll know that images can be one of the biggest speed traps for your blog. Of course, every blog needs to utilize images, for they are engaging and can instantly liven up your posts. When your blog focuses on product reviews, such as mine does, images and detailed pictures are essential. The trick though, is not to sacrifice blog speed for blog appearance and this requires certain image optimization techniques to be in place.
I highly recommend you apply the following set of tips and procedures to EVERY SINGLE IMAGE YOU HAVE ON YOUR SIDEBAR(S) for maximum results and improved blog speed. Your sidebar is present on every single post and page, so cleaning up your sidebar's images will definitely help you see a positive gain in speed.
These are the steps I use anytime I place an image on my blog, either in the sidebar or in a published page or post. This list is by no means definitive...it's just what I've come to find works well for both me and my blog's performance.
- Install WP Smush.it Plugin ~ Since I run a self-hosted WordPress blog, there will be some tips I have specific to WordPress, and this is one of them. This plugin is essential in my opinion because it automatically strips and optimizes every image that is loaded into your Media Library, without you having to do a thing! Try this out and I'm sure you'll love it as much as I do.
- Host all images yourself ~ Personally, I host all my images on a subdirectory within my blog for several reasons. I don't have to worry about some of the images not being displayed if another site is down around the web and most importantly, I don't have to ask my blog to pull from hundreds of different sites for all of my images. Every time your blog has to go outside of itself to request data, it will slow down. Images should definitely be stored in house, or all in ONE place outside of your blog, such as a CDN (Content Delivery Network) or an image storing service like Flickr or Picasa.
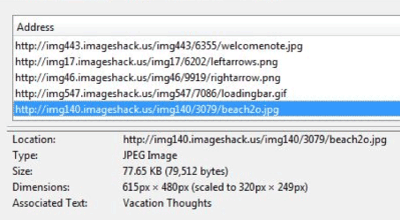
- Don't Scale Your Images ~ I had absolutely NO idea about this one when I first started blogging and would just plop any old image onto my page or sidebar and let my blog automatically scale it down for me. For instance, I might have a picture of my daughter which was 900 x 600 pixels that I wanted to publish in a post, but this post only had room for a picture that was 300 x 200 pixels. I would still insert the 900 x 600 pixel picture and then use the width and height attributes inside my blogging program to make the image any size I wished. This is scaling an image and it is a major no-no, for your blog actually receives a double whammy anytime this happens. First, your blog will be punished speed-wise, for it is really hosting a very large image, even though it is displaying a small one. Second, your blog is being asked to perform a request on that image and scale it down, which also uses up your blog's resources. So how do you know which images are being scaled? Either the Google PageSpeed or YSlow tests will tell you, or you can right-click on each image in your blog, while using Firefox, and select "View Image Info". If you are scaling an image, you will see a result very similar to the following:

Notice in the "Dimensions:" section, this image is really 615px x 480px but is being scaled down to 320px x 249px. In order to avoid this automatic speed stealer, make sure that every image you display on your blog has been saved in the exact same size you are going to use it.
- Use JPEG format ~ I've read many, many opinions on graphics optimization and most people will agree that the JPEG format is the least obtrusive and fastest image format on the web. I recommend immediately changing all of your sidebar graphics to the JPEG format, for improved blog speed. There are many programs which will accomplish this, but I prefer using Adobe Illustrator. With this program, I can resize my image, control whether or not it will be transparent and change the format to JPEG, all at the same time.
- Essential Images ~ Of course, the easiest way to speed up your blog and optimize your images is to ditch any of the ones which are inessential. Think very hard about what it is you're trying to accomplish with your blog and whether or not that image is really what you need to get you there. At the very least, maybe you can use a smaller image to perform the same job, instead of the really large one. Remember, if it's slow...it's got to go!
If you have any questions, please don't hesitate to leave me a comment and I will do my best to help. Until next time...have a wonderful day! :)
LET ME PICK YOUR BRAIN!
What tips and techniques do you have for optimizing your blog's images and graphics?

I'm a former 7th grade Science teacher turned stay-at-home mom that lives in Houston, Texas. I am married to my college sweetheart and have a beautiful daughter named Riley, who definitely keeps me on my toes! I am also involved in starting a small business which would both manufacture and sell an invention that I've patented, called Toothpaste 2 Go. I love interacting with my readers and hope to learn as much about you as you learn about me!
Melissa @ Mommy Living the Life of Riley!
Add Melissa Cleaver to your LinkedIn Network
Add Mommy Living the Life of Riley to your Google+ circle |


